Egg candles: an easy spring craft for big kids and adults
/Many Ostara/spring equinox crafts for kids and adults come out looking suspiciously like Easter crafts. And well, obviously there are good and honorable reasons for that. But still... sometimes you get a hankering for something entirely earthy.
I love early spring with its scents of seeds swelling and soil thawing. Even before the equinox I can feel the tension of it, like a bow string taught and ready to release an arrow. This calls for a craft with strong earth and birth symbolism.
I am definitely attracted to the idea of crafts that involve filling egg shells with earth and growing either grass, herbs or a small flower in them. But there is yet little sunlight at our northern latitude before the equinox and my egg pots usually come out looking pretty pitiful, rather than like a glorious celebration of spring. And that's if they sprout at all. A nice alternative for those without either the sunlight or the green thumb is to make egg candles for Ostara.
This craft fits nicely in with the Imbolc period of candle-making before Ostara and if you use beeswax, the result is wonderfully grounded and primed to boost rituals for fertility, creativity, rebirth and growth of all kinds.
I was intimidated about candle-making for far too long, believing it was a craft only for those with a lot of experience and time on their hands. But at last, I was delighted to find a simple method that really doesn't take much time at all.

1. Cleaning the egg shells: First, the next time you cook with eggs, crack your eggs by carefully tapping the smaller end of them, rather than the middle. And then use your fingernails to peel back bits of the shell until you can dump the contents into your cooking container. Carefully chip away the shell until you have an opening only at the top of the egg, leaving most of the egg shell intact. Wash the egg shells with warm water and leave them out to dry for a few days.
2. Gathering your supplies: Meanwhile get together everything you will need.

- First, you'll need a pan for melting wax. I recommend using something you won't be cooking food in, but I do use my pans that for making medicinal salves that also use wax. Wax residue just isn't good in soup.
- You will obviously need some wax. Beeswax is best but any kind of candle wax or even the stubs of old candles will do.
- If you want to color your candles for Ostara-pink, green and yellow wax colors are perfect.
- You will also need wicks. These can usually be bought at any craft store. The kind with small foil circles at the bottom are best for this.
- Otherwise, you'll need a wooden spoon, paper towels, wax paper and some small sticks or chopsticks.
3. Melting the wax: Heat your wax over a low heat on the stove, stirring occasionally. If you use low heat you don't need to worry that it will burn. Just don't leave it long enough that it starts boiling rapidly. Skim off any debris that may have been in the wax.
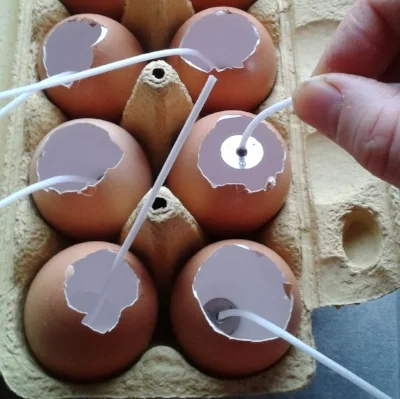
4: Setting up your candle molds and wicks: While the wax is heating, set your eggs (now candle molds) upright, probably in an egg carton. Place a wick into each egg with the small disc at the bottom.

5: Pouring the wax: When the wax is uniformly liquid, carefully pour it into your eggs. You can use a dipper but that too will become coated with wax. I also recommend putting wax paper under your eggs to catch drips of wax. Wax, particularly sticky beeswax, is rather difficult to clean off of surfaces and particularly hard to get out of fabric. It also burns the skin, so be sure to have small children stand clear of the immediate area while you're pouring.
6: Holding the wicks in place: Now here is the only slightly tricky part. As your egg candles cool, you want to keep the wicks in place with the bottom of the wick at the bottom of the egg shell (not floating up) and with the wick coming out of the wax in the middle the hole at the top of each egg, rather than along the side which will be its natural tendency.

Because it takes awhile for the hot wax to cool and solidify, it is usually not possible to hold them there by hand unless you only have one candle for each hand. (If you do have enough hands, just hold the wicks in place and sing some songs for spring minutes and you'll be done in far simpler fashion and have an extra dose of creative energy in your candles.) The method that works best for me to hold the wicks in place without a lot of helping hands is to use two sticks--such as a pair of chopsticks--and pinch the wicks between the sticks, while resting the sticks on the tops of the eggs. The trick is to get a bit of the hot wax onto the top portion of your wick and then use the still warm wax to glue the wicks to the sticks by holding them firmly pinched for a moment. In the end the wick-holding mechanism looks like the photo to the right. (I'm hoping Dr. Seuss will do a book on wicks and sticks, based on this blog post. :D )
7. Cleaning up: This is one craft where a specific note on cleanup is appropriate. Most commercial candle wax comes off of hard surfaces if you just let it cool and then peel it off. You can remove it from clothing by placing paper towels under and over the cloth and then ironing well.

But beeswax can be a bit stickier and doesn't always come off well. The thing to remember is that beeswax and other waxes will also come off with heat. This is why I recommend keeping paper towels on hand for this craft. As soon as you are done with your pot and spoon, wipe them well with paper towels while they are still hot. (That part of this step should be done before you even hold your wicks in place.) You can also use paper towels to wipe dripped wax off the outside of the eggs if you strike quickly while they're still hot. But if you drip wax on a cool surface (such as the table) leave it alone until it cools completely. If you do end up smearing wax on the table, use a rag soaked in hot water.
8. Decorating: You can paint the outsides of your candles or tie ribbons around them. To hold them upright, either drip a bit of wax onto a hard surface and place the candle firmly on top, pressing down gently until it cools and the candle stays upright, or you can fill a bowl with rough sea salt, sand or rice and place the egg candles upright in it. Dry (uncooked) rice with green food coloring gives a nice spring touch.
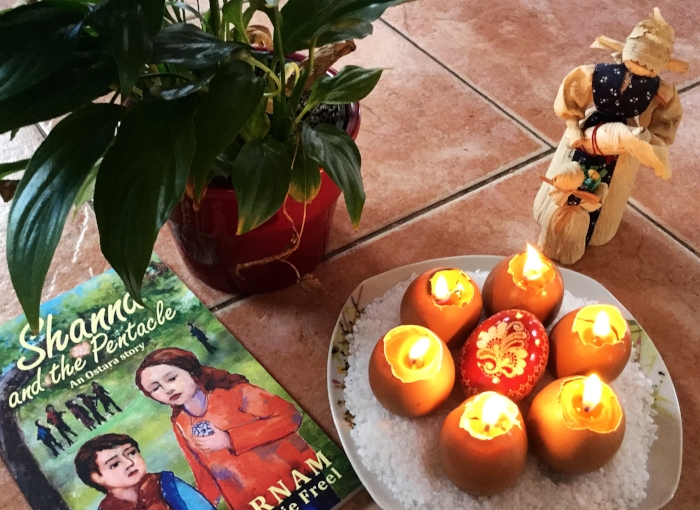
If you would like more practical Ostara crafts and ideas for earth-centered families, take a look at the kid's adventure book Shanna and the Pentacle. It includes craft ideas for this holiday as well as the story of a sister and brother who move to a new school and learn about cultural diversity and standing up for their own beliefs.