Spring Equinox blessings from the crafty kitchen
/
Let the rain rain and the wind blow
An end comes to the the reign of snow.
Bright hues take from the drawer.
Life's new chance knocks at the door.
If your spirit sometimes feels a bit bruised these days, you're not alone. There are not a lot of good fixes that will harden our spirits without closing us down. But there is solace.
For me, one solace is creating useful items that are also beautiful in connection with the natural world. It can be difficult to find the time, but well worth it when you do.
Carve out a little time, brew some tea, light a candle and get out supplies. I have several crafts here to suit the materials on hand. Each one helps to ground and renew the spirit.
These crafts are inspirations for Ostara/Spring Equinox/Easter crafts that are not actually made with an egg shell for a change. These are easy crafts individually and can be handled by a frazzled mom and kids, at least by this one, or by those without a ton of craft experience. And yet they are real crafts with tangible and useful results.
I include crafts in my blogs because I am often frustrated by the craft sites online that seem to give no thought to how hard it is to fit these things into everyday life, especially when you have little ones. I include here both realistic instructions and my own learning experiences in hopes that others may be saved the hassle.

Easy Equinox Spring-in-your-step Soap
This is from an easy melt-and-pour soap recipe but can be used even if you're making your own lye soap. I used a moisturizing, clear glycerin soap base. I was frustrated with the soap we buy at the store that dries our skin and doesn't smell all that great. Also my daughter is always begging to buy expensive colorful soap and this is healthy, quick, easy and cheap.

- Cut a block of soap base into small cubes or quarter-inch thick slices with a sharp knife
- Heat in a pot devoted to soap and candle making on a low heat.
- Prepare a box (plastic or paper lined with plastic) or soap molds if you have them. I used a paper handkerchief box lined with wax paper.
- When the soap has thoroughly melted in the pot, add a few drops of food coloring. Just a few! Mine came out a very rich color and that was probably only three drops. (We used purple for luck, independence and psychic connection and because my daughter wanted purple. Other great spring colors are green (for prosperity and success), yellow (for happiness and imagination) and light blue (for peace and tranquility).
- Add 20 to 40 drops of essential oils (depending on your sensitivity to fragrances). We used mint (for happiness and spring renewal), pine (for healing, protection and fertility), geranium (for spring love and joy, as well as not incidentally an excellent repellent for tick season) and a touch of lavender (to dispel any lingering winter doldrums). This is what I call the spring-in-your-step soap fragrance.
- Add a handful of ground or finely chopped and crushed herbs. I use lavender flowers, which are pretty so I don't entirely grind them up. They give the soap a nice scratchy, scrubby texture which helps clean off the dead skin that accumulates over the winter (defoliation). And it adds lovely natural beauty. Stir the herbs in well.
- Pour the melted soap into your prepared box or molds.
- Let it sit for at least three hours or overnight. Remove it from the molds. It slides right out. Then, if you have used a box like I did, cut the soap into bars. I recommend making smaller bars than you would normally buy in the store because glycerin soap, which is healthier than the stuff you usually buy in the store, softens faster in damp conditions in the bathroom. A smaller bar will end up wasting less soap and you'll replace it more often.
- Wrap the bars in plastic wrap to store. The one mistake I made in this process the first time around was not wrapping up my soap. It dried out and cracked a little over time. It was still quite usable but not as pretty. Plastic or wax paper will work better. Paper often sticks to the soap.
Time for a luxurious spring bath!
Salt-dough egg decor
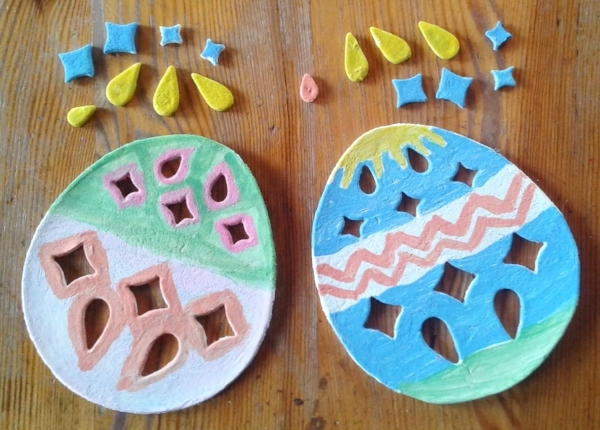
This is a craft for my kids who love painting. It makes beautiful home decor, something to put on the wall above the table or in place of a wreath on the front door for spring. And it's a very forgiving craft. Even a toddler can make a beautiful spring egg if given bright colors and an egg shape.
- Mix salt dough (A cup of flour, a cup of salt, 2./3 cup hot water, a table spoon of oil) and roll out thin.
- Use a large shape cutter or a knife to cut an egg shape about as big as your outstretched hand.
- Use small cookie cutters to cut out shapes from the inside (butterfly and flower cookie cutters are great but small circles and diamonds are fine too).
- Save the cutouts to glue on in other places on the egg shape.
- Bake on low heat or air dry for several days.
- Paint with bright and pastel colors.
- Use glue or a glue gun to place the cutout shapes on the egg.
- Hang as a spring decoration

Equinox candle magic
I'm crazy about candles in general and celebrating the Wheel of the Year I love to have candles specifically designed for various occasions. One way to do that is with color and scents. But I also wanted to find a way to make candles in various shapes.
I am also a cookie-cutter enthusiast, so I figured I could make candles in cookie cutters one way or another. So I started experimenting.
As you can imagine, the first experiments resulted in a lot of wax running all over the table. I suggest using paraffin wax, not beeswax for these candles. Beeswax will stick in small crevices of cookie cutters and be hard to remove without breaking the candle. Beeswax is also harder to remove from your table. With paraffin wax the old adage your mother probably told you really does apply: Don't touch it until it's cool and it will come right off.
After several more experiments I found that if you place a piece of wax paper over several layers of soft paper towels, you have a slick and wax-proof surface that is also slightly soft. When you go to pour your melted wax, you press down hard on the cookie cutter and it cuts into the soft surface, trapping the wax inside. Pour only a quarter-inch of wax and then wait and blow on the surface of the wax. You should be able to release it without the wax spilling after 30 to 60 seconds, depending on how much wax you have poured.
Let that candle sit and move on to your other cookie cutters or molds until the thin layer of wax in the bottom of the cookie cutter has more thoroughly cooled. Then position a wick in the middle of your candle and pour in a little more wax. Hold down the cookie cutter and wait a bit, holding the wick in place. The cooled wax at the bottom will remelt somewhat so if you bump the cookie cutter, you could have it all spill out. But it will only melt a little and mostly it should stay.
Once you have your candle half full and slightly congealed, you've won. With that candle at least. Top off the candle as high as you can go and making sure the wick stays central and upright.

Hints and tips:
Grease your cookie cutters with cooking oil before use. I haven't had much trouble getting candles out of the cookie cutters but a little oil helps it slide.
Don't worry if your cookie cutter molds leak. Just don't lift them up. Let spilled wax cool and keep pouring. The leaked part will serve as a dike and eventually your candle will get full. Then peel the spilled wax off the wax paper and put it back in the pan to remelt. No harm done. Just keep hot wax off your clothes and skin.
Step-by-step cookie-cutter candle-making instructions:
- Set grated or cut paraffin wax in a pot on low heat to melt.
- Select theme-appropriate cookie cutters as molds and grease them with a little cooking oil. Deep cookie cutters are better but even a very short candle will burn and look pretty.
- Lay down three or four layers of paper towels and cover with a sheet of wax paper. Place cookie cutters on the wax paper.
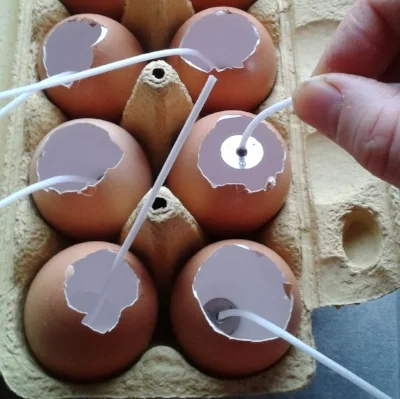
- Ready short pieces of wick about an inch longer than the depth of your cookie cutters.
- When the wax is fully melted add essential oils for fragrance. For spring I enjoy lemongrass and rosewood. And add wax colors, if you have them. Do not use liquid food coloring. I actually tried it and it does not work at all.
- Hold a cookie cutter down firmly. Pour a quarter inch of hot wax into the bottom. Continue to hold for 30 to 60 seconds. Then release and repeat with remaining cookie cutters.
- Return to the first cookie cutter and place a short piece of wick upright in the center. With some luck it will simply stick into the congealing wax and stand up without being held in place. Repeat with remaining cookie cutters.
- Once the wax is visibly congealing, pour in more wax little by little to allow time for the wax to congeal.
- Hold wicks in place as you wait for the wax to cool.
- Top off the cookie cutters as much as possible. There is no need to leave room at the top. The wax slightly contracts.
- As the wax cools, peel off spilled wax and return it to the pot for reheating.
You can use this method to make themed candles for many holidays. My favorites are sun, star and moon shaped candles, leaves, eggs and flowers for the spring, fruit and animals for the summer, acorns and deer (reindeer from Christmas cookie-cutter sets work great) for the fall, and trees, stars and suns for winter.

I hope these craft ideas are helpful or at least inspiring. Please share this post with interested friends.
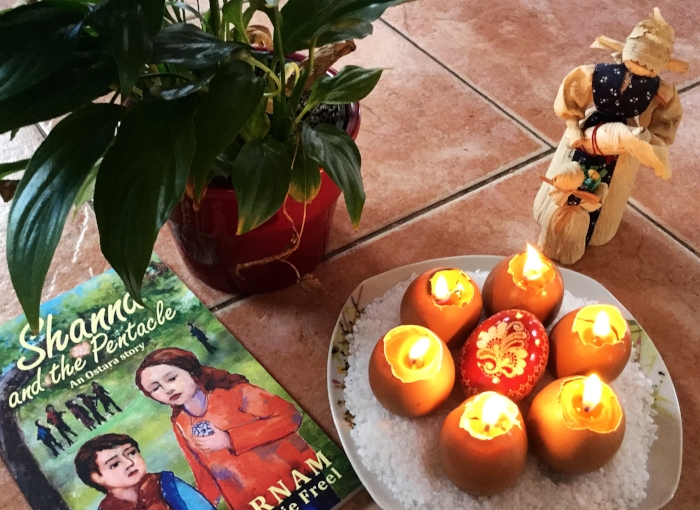
You may also enjoy the children's chapter book with illustrations by Julie Freel that I have for Ostara. It is a story for kids ages six to twelve that centers around the Spring Equinox and deals with the difficulties of new beginnings, friendship and learning about diverse cultures. It is primarily a fun book for kids and my kids won't put it down, but it also contains ideas for natural egg dyes and other spring celebration plans.
Blessings of spring renewal to all!